

Other than the initial investment, 3D printing is very inexpensive, for a large part (eg. 9″x 6″ x 5″), that takes 16 hours to print at 40% infill (don’t worry we’ll cover what this means below) should only cost around $5-8 in material. Small to medium parts, especially if they are 10-15% infill, cost nearly nothing.
Here is the quick no fluff guide to getting started with FDM 3D printing. Its one of the most versatile tools, that allows you to quickly prototype, make functional parts out of plastic, and even can be used to make molds for making things out of metal or rubber.
Get used to the idea of making your own CAD models. It sounds hard, and it certainly takes learning, but trust me as someone who hadn’t don’t CAD before, and now is able to make whatever I want; there are programs that are generally intuitive.
You’ll want to start with a program called Design Spark Mechanical; because it is a free stripped-down version of SpaceClaim. If you ever outgrow DSM, you can move seamlessly to SpaceClaim. The GUI and interface will look exactly as it did in Design Spark Mechanical, but with more features and options.
Not only is it better to start with because it is free, but its also a new style of 3D modeling software that utilizes push/pull methodology to build something.
Other CAD programs like Solidworks require constant mathematical inputs and utilization of various specific tools.
In DSM or Spaceclaim, you can grab a face, or an edge and just push/pull it to build, remove, cut, and form. Notwithstanding, where required, you can also select an edge or the measurement tool and be as precise as required. It gives you the flexibility of a simple forming tool, with the capability of a full blown CAD program.
Alongside creating your own 3D models, there are platforms where people upload their models for anyone to use free of charge. The two best websites are:
www.thingiverse.com
www.grabcad.com
The former has all models in .stl format which can be used immediately for printing. The latter has a mix of .step files (CNC based), solidworks and other file extensions. Spaceclaim is generally able to open all of these formats to then save as .STL.
A fun place to see functional prints is https://www.reddit.com/r/functionalprint/
Next, you’ll want to select a 3D printer, I prefer the Flashforge line of products because they have the capability of much more expensive units but work flawlessly without too much assembly.
The general difference between cheap and expensive machines are:
1. The ability for be enclosed for printing certain filaments
2. The unit being preassembled versus needing self assembly
3. Metal parts versus plastic parts for longevity
4. Print resolution
5. Print bed size
6. Single vs double extruders
7. Heated vs non heated print bed
Generally, I recommend getting a printer that has at least a heated bed, because nearly all filament types will benefit from a heated bed.
Filament types: a fancy way of saying ‘different types of plastic’. Most 3D printers will come with a starter set of PLA; mainly because it prints very easily. PLA filament although easy to print with, should only be used for short term prototyping because it is hygroscopic, meaning it absorbs water over time, and therefore becomes brittle.
PETG or PCTG is a great filament to use in place of PLA, because it similarly doesn’t need be be enclosed while printing (like ABS does), and produces a long term part that is very durable. Nearly any machine that is able to print PLA will be able to print PETG (simply confirm if extruder can reach 230c).
Skip trying to print with ABS all together; it needs to be enclosed, doesn’t like to stick, curls easily, and its a good idea to exhaust the fumes. None of which is required with PLA or PETG.
Slicer: To convert an .stl file to gcode (the machine talk the 3D printer understands), you will need a “slicer” program. The best free program I have found is Replicatorg. Replicatorg is an open source slicer that works and can be edited to work with any number of 3D printers, including custom or one off builds. If you go the flashforge route, flashforge has their own slicer called Flashprint that is very nice.
General settings: The main general settings will be filament size (3mm or 1.75mm), layer height, speed of the print head when printing and when traveling, as well as extruder heat and bed heat.
My recommended PETG settings are: 230c Extruder, 80c bed, 50mm feed rate and 70mm travel, layer height .27 or lower.
*Random values set for illustration purposes on where/how the values get entered.
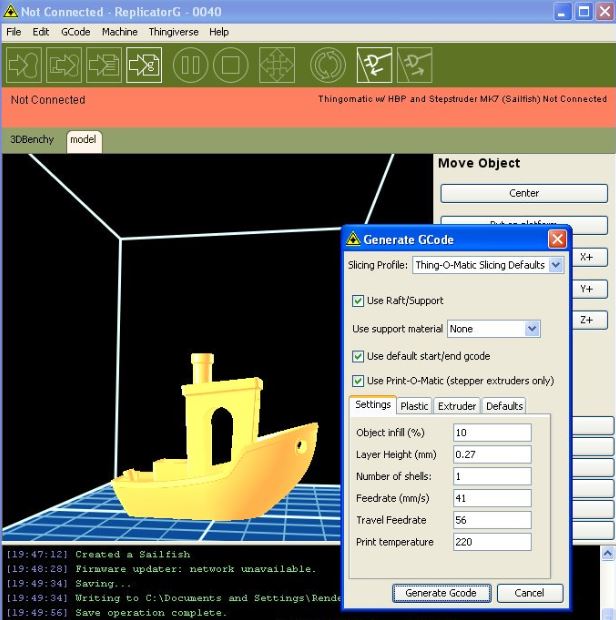
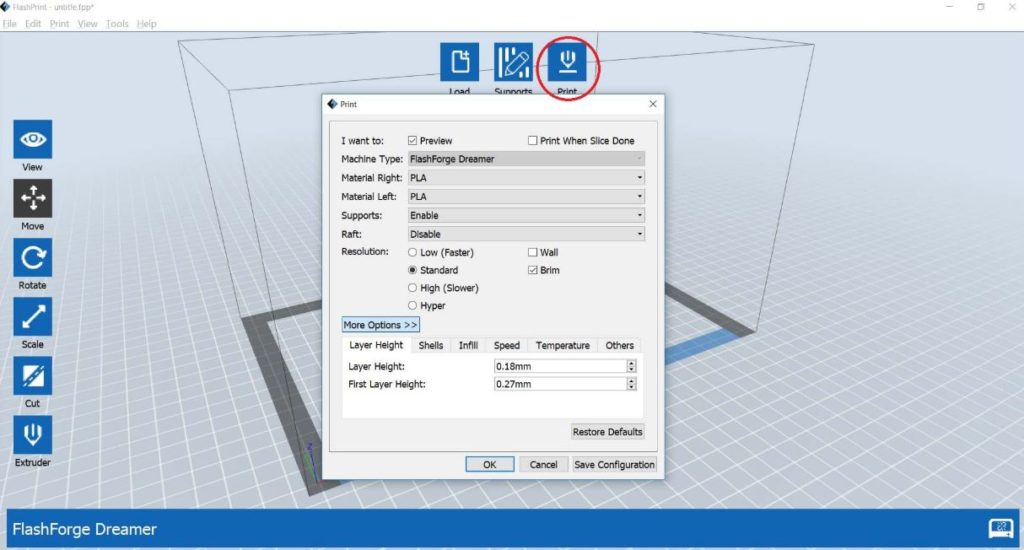
*Random values set for illustration purposes on where/how the values get entered.
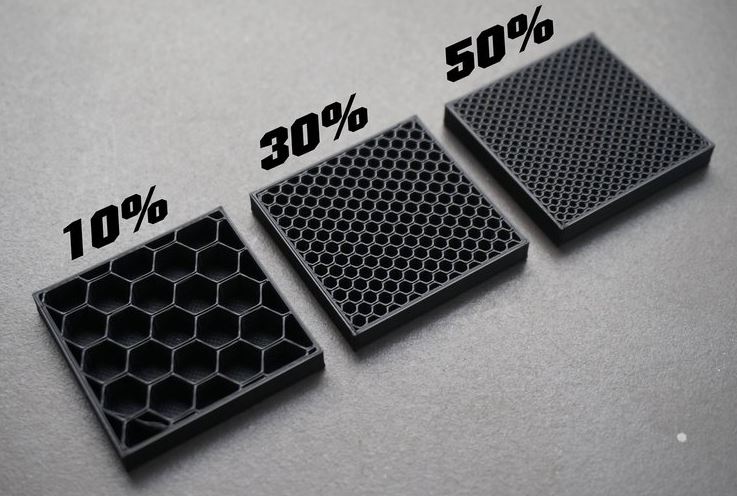
Infill: Unless you want the piece to be printed of 100% solid plastic, normally its smart to set an infill within the slicer. 10-15% infill will give you a good amount of strength without the need for too much filament or print time.
Wall thickness: this is counted as a “shell count”, it is the number of solid lines at every edge of the piece being printed. If you set the count to 3, it will have 3 solid layers before it gets to the infill. 1-2 is fine for non structurally important parts, and 3-4 for ones that are.
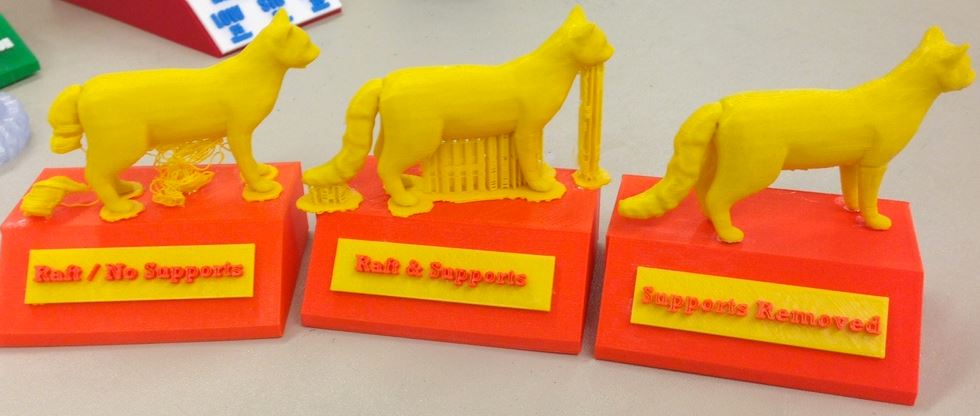
Rafts and Supports: Supports are needed where you plan to have overhang or will need bridging of filament. The slicer takes care of this for you. The support material requires post print processing to remove, but generally prints in a way that allows it to be easily removed.
Bed adhesion: Some brands and filaments just don’t like to stick to the bed. To solve this, get extra strong hair spray and apply a thin layer before printing.
Leave a Reply